Wondering how to replace car battery terminal? Your car’s battery is responsible for starting the engine and powering all the electrical components in your vehicle. But what many people overlook are the battery terminals—the connectors that attach the battery to the rest of the car’s electrical system.
Over time, these terminals can corrode, wear out, or become loose, causing a variety of electrical issues like difficulty starting the car or flickering lights. Luckily, replacing car battery terminals is a relatively simple task that most people can do themselves with just a few basic tools.
In this guide, we’ll walk you through the process of how to replace car battery terminals, the tools you’ll need, and some safety tips to ensure the job gets done properly.
What Are Car Battery Terminals?
Car battery terminals are the two metal connectors that attach the battery cables to the battery’s positive and negative posts. These connectors ensure that electricity flows from the battery to the electrical systems of the car.
The positive terminal is typically marked with a red cover or a plus sign (+), while the negative terminal is marked with a black cover or a minus sign (–). Over time, the metal of the terminals can become corroded, which impedes the flow of electricity.
This can cause starting problems, dim lights, or even complete power failure in some cases. If the terminals become too worn out or corroded, they’ll need to be replaced.
Tools and Materials You’ll Need
Before you start replacing your car battery terminals, gather the necessary tools and materials. Here’s what you’ll need:
- New battery terminals: Make sure to purchase the correct size for your vehicle’s battery posts.
- Wrenches: Typically a 10mm wrench or socket is needed to remove the terminal bolts.
- Wire cutters and strippers: To cut and prepare the battery cables if necessary.
- Screwdriver: For loosening and tightening screws on the terminals.
- Battery terminal cleaning brush: To remove corrosion and clean the posts.
- Anti-corrosion terminal grease: To help prevent future corrosion.
- Work gloves: To protect your hands from chemicals and sharp edges.
- Safety goggles: To protect your eyes in case of sparks or battery acid.
Safety First
Whenever you’re working with a car battery, safety should be your first concern. Batteries contain sulfuric acid, which can cause burns, and they also produce hydrogen gas, which is highly flammable. Here are some safety tips to keep in mind:
- Turn off the car: Before you start, make sure the car is off and the keys are out of the ignition.
- Wear gloves and goggles: Protect your hands from acid and your eyes from any potential sparks.
- Disconnect the negative terminal first: This reduces the risk of short circuits when you’re working with the battery.
- Work in a well-ventilated area: Since batteries can emit gas, it’s best to work outside or in an open garage.
Step-by-Step Guide to Replacing Car Battery Terminals
Now that you’ve got your tools and safety gear ready, it’s time to replace those old, corroded battery terminals.
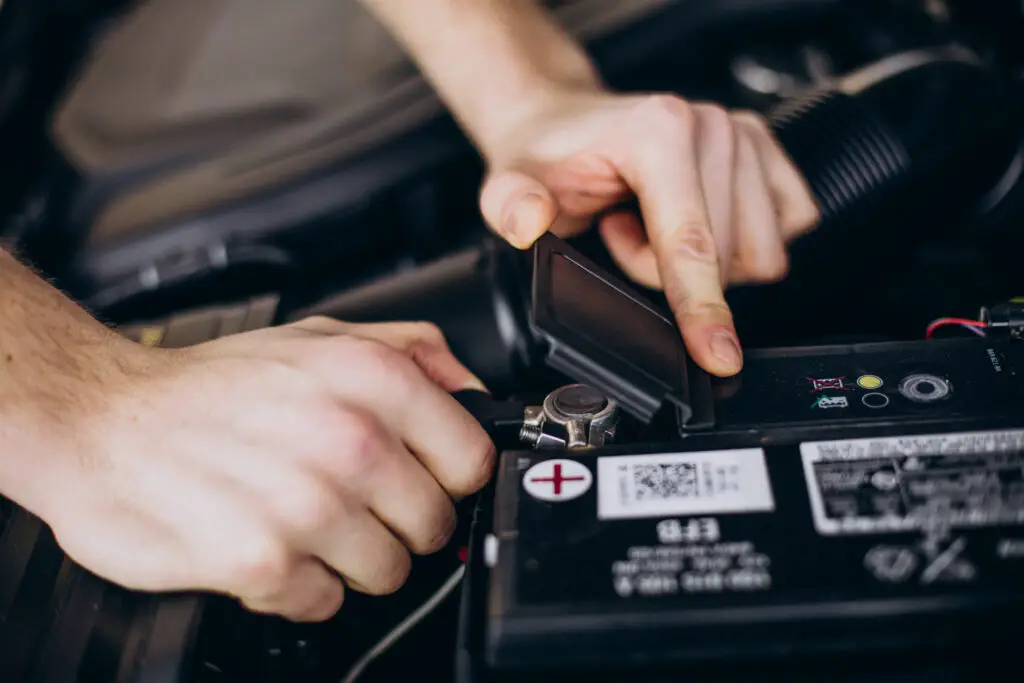
Step 1: Disconnect the Battery
Start by disconnecting the battery cables from the battery terminals. Always begin by removing the negative (black) cable first, followed by the positive (red) cable. Use your wrench to loosen the bolt on each terminal and carefully pull the cable away from the battery post.
Step 2: Inspect the Battery Cables
Once you’ve removed the battery cables, inspect them for signs of wear or corrosion. If the cables are severely damaged or corroded, you may need to replace the cables entirely, not just the terminals. Otherwise, proceed to the next step.
Step 3: Clean the Battery Posts
Use a battery terminal cleaning brush to clean the battery posts thoroughly. Scrub away any corrosion, dirt, or debris. If the corrosion is particularly bad, you can make a paste using baking soda and water to help neutralize the acid.
Apply the paste to the corroded areas, let it sit for a few minutes, then scrub with your brush. Rinse the pots with clean water and dry them with a cloth before moving on.
Step 4: Cut and Strip the Battery Cables (If Needed)
If the old terminals are permanently attached to the battery cables or if the cables are damaged, you’ll need to cut off the damaged portion of the cable. Use wire cutters to snip the cable close to the old terminal, then use wire strippers to remove about ½ inch of insulation from the end of the cable, exposing the copper wire.
Step 5: Install the New Battery Terminals
Now it’s time to install the new battery terminals. Most replacement terminals consist of two parts: a clamp that attaches to the battery post and a section where the cable is inserted and secured.
- First, attach the new terminal to the battery cable by inserting the stripped end of the cable into the terminal’s opening. Use a screwdriver to tighten the screws that hold the cable in place.
- Next, place the terminal over the corresponding battery post. The positive terminal (marked in red) goes on the positive post, and the negative terminal (marked in black) goes on the negative post.
- Tighten the clamp on the battery post with your wrench, making sure it’s snug but not overly tight.
Step 6: Apply Anti-Corrosion Grease
To prevent future corrosion, apply a thin layer of anti-corrosion terminal grease to both battery posts and the new terminals. This grease helps to protect the metal from the elements, extending the life of your new terminals.
Step 7: Reconnect the Battery
After the new terminals are installed and greased, reconnect the battery cables. This time, connect the positive (red) cable first, followed by the negative (black) cable. Tighten the bolts on each terminal to ensure a secure connection.
Step 8: Test the Connection
With the new terminals in place, it’s time to test everything. Turn on your car and check the electrical systems, including the headlights, radio, and other accessories, to make sure everything is working properly.
If the car starts without issue and the electrical systems function as expected, you’ve successfully replaced the battery terminals!
Why Replace Battery Terminals?
Over time, battery terminals can corrode due to exposure to the acidic fumes from the battery, moisture, and the elements. Corroded terminals can cause poor electrical connections, leading to hard starts, dim lights, and other electrical issues. By replacing worn-out or corroded terminals, you ensure a reliable connection between the battery and the vehicle’s electrical system, keeping your car running smoothly.
Final Thoughts
Replacing your car battery terminals is a simple, job that can make a significant difference in how your vehicle performs. By following the steps outlined above, you can ensure a solid electrical connection and prevent annoying electrical issues caused by corroded or worn-out terminals. Regularly inspecting and maintaining your battery terminals will also help prolong the life of your battery and keep your vehicle in top shape.
So next time you pop the hood and notice some corrosion on your battery terminals, don’t wait for electrical issues to creep up—grab some tools, replace those terminals, and enjoy a smooth ride.
Author
Discover more from Chikwem
Subscribe to get the latest posts sent to your email.